Port is a desktop GUI application that allows you to spin up, access, and manage your Urbit ships without any knowledge of the command line or Urbit binary.
Features
- Boot a new comet, planet, moon or star.
- Import an existing pier
- Use a ship via its web interface.
- Manage and run multiple ships.
- Connect to the web interface of a remote ship.
- Start/stop a ship.
- Export a pier in a zip file.
Install
Port is available for Linux, MacOS and Windows. See the Getting Started for installation instructions.
Boot a comet
With Port freshly installed, you can select Start without an ID on its home
screen. If Port already has other ships installed, you can navigate to Home,
drop down the Boot Menu and select Comet. You'll be presented with the
following screen:
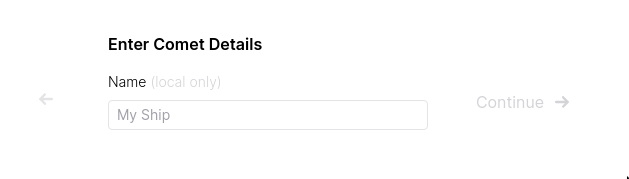
Give your comet a name in the Name field. This name is just displayed locally
in Port for convenience. Next, hit Continue. It'll take a few minutes to spin
up the new Comet, then you can click on Launch Ship into Urbit and it'll take
you to the login screen. Click on Copy Access Key at the bottom-left, paste it
into the Access Key field, and hit Continue. You'll now be at your ship's
home screen and ready to explore Urbit.
Boot another ship
Important: This is for booting a ship for the first time, or for booting a ship which has just undergone a factory reset. A ship should only be booted from its keyfile in its current rift once. If your ship has already been booted elsewhere, see the Import pier section instead.
With Port freshly installed, you can select Boot a fresh ID on its home
screen. If Port already has other ships installed, you can navigate to Home,
drop down the Boot Menu and select either Planet, Moon or Star depending
on the kind of ship you're booting. You'll be presented with a screen that looks
something like this:
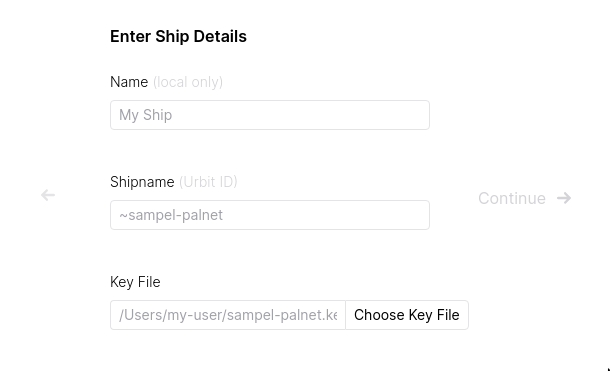
Enter a name for your ship in the Name field. This name is just displayed
locally in Port for convenience. Next, enter your ship's name (e.g.
~sampel-palnet) in the Shipname field. For Key File, select Choose Key File and browse to its location on your computer. If you don't have your
keyfile yet, see step one of the Setting up your
urbit guide. Once you've selected the keyfile,
hit Continue.
It'll take a few minutes to spin up the ship, then you can click Launch Ship into Urbit and it'll take you to the login screen. Click Copy Access Key at
the bottom-left, paste it into the Access Key field, and hit Continue.
You'll now be at your ship's home screen and ready to explore Urbit.
Import pier
Port can import existing piers. For example, if you've been running your ship with the Urbit binary from the command line, and would now like to run it with Port instead, you can do so.
With Port freshly installed, you can hit See More Options on the home screen
and then Boot an existing ship. It should bring up this screen:
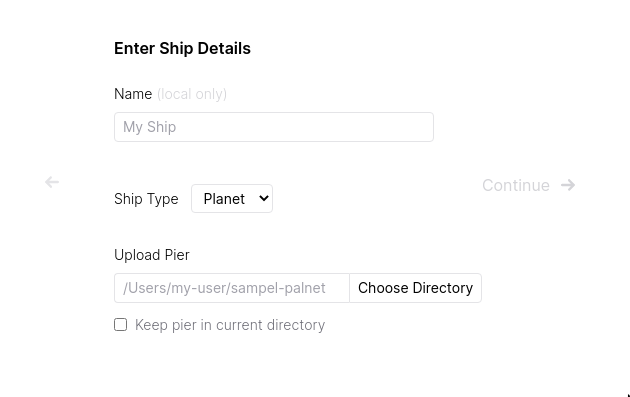
In the Name field, give your ship a name. This name is just displayed locally
in Port for convenience. Next, select the type of the ship you're importing from
the Ship Type drop-down menu. Under Upload Pier, click Choose Directory,
then browse to your pier in the file system.
Important: Make sure you have shut down your pier before trying to import it.
By default, Port will move it into its own directory for piers it manages. If
you want to keep it in its current location instead, check the Keep pier in current directory checkbox. Finally, hit Continue and then Launch Ship into Urbit and it'll take you to the login screen. Click Copy Access Key at the
bottom-left, paste it into the Access Key field, and hit Continue. You'll
now be at your ship's home screen.
Connect to remote
Rather than running ships locally, Port can also connect to remote ships, for example those running on cloud servers. This simply connects to the web interface of the remote ship, it doesn't move its pier.
With Port freshly installed, you can hit See More Options on the home screen
and then Access remote ship. It should bring up this screen:

In the Name field, give your ship a name. This name is just displayed locally
in Port for convenience. Next, enter the full URL (including the http[s]://
part) of the remote ship's web interface and hit Continue. You'll now be at
your ship's login screen. Enter your web code and login, you'll now be able to
use it from Port.
If you want to remove the ship from Port you can go Home, hit the Manage
button for the ship, and select Remove under Ship Migration. This will
remove it from Port and disconnect it from the web interface, but the ship will
keep running as usual on the remote host.
Navigation
From the home screen of Port, you can hit Open on a ship to access its web
interface. When you're in a ship's web interface, you can hit Home in the
bottom-left to return to the Port home screen.
To manage a ship in Port and see details about it, you can hit the Manage
button for the ship in question on the home screen.
Start/stop a ship
To stop a ship in Port, hit the Manage button for the ship on the home screen.
Then, hit the Stop button, and the ship will be shut down. Its status will
have changed from Running to Stopped.
To start a ship again, just hit the Launch button on the ship's Manage
screen. It'll automatically open the ship's web interface, and the ship's status
will be back to Running again.
Eject pier
If don't want Port to manage a particular ship any longer, for example if you want to move it to a cloud server, you can export it from Port.
From Port's home screen, hit the Manage button for the ship in question. Then,
under Ship Migration, hit the Eject button. Port will shut down the ship,
remove it from Port and compress its pier into a .zip file. It will also open
a file browser so you can copy it somewhere else. The location of the .zip
file will be the path to the pier shown on its Manage screen.
Once you've moved the .zip file to its new location, it can simply be unzipped
and started again. If it's being moved to another machine which also runs Port,
see the Import pier section for details of importing it.
Delete pier
Warning: Deleting a pier is irreversible, and all data will be lost. If the ship is a comet, the comet name will be unusable again. If the ship is a planet or star, you will need to perform a factory reset via Bridge to be able to use it again (and all of its data will still be lost).
To completely delete the pier of a ship managed by Port, go to the home screen
and click Manage for the ship in question. Then, under Ship Migration, hit
Delete Permanently and accept any warnings. The ship's pier will be deleted
and it will be removed from Port.